Having had the chance to participate in Hackthebox’s 2023 Cyber Apocalypse CTF event, I saw it fit to make a writeup for the challenges I managed to solve and explain the pitfalls encountered along the way.
Final list of solved challenges on my end was:
- [PWN] Initialise Connection
- [PWN] Questionnaire
- [PWN] Getting Started
- [Web] Trapped Source
- [Web] Gunhead
- [Web] Drobots
- [Web] Passman
- [Web] Orbital
- [Reversing] Shattered Tablet
- [Reversing] She Shells C Shells
- [Reversing] Needle in a Haystack
- [Misc] Persistence
- [Misc] Hijack
- [Misc] Restricted
- [Crypto] Ancient Encodings
- [ML] Reconfiguration
- [Forensics] Plaintext Treasure
- [Forensics] Alien Cradle
- [Forensics] Extraterrestrial Persistance
- [Forensics] Roten
- [Forensics] Packet Cyclone
Out of these, I’d like to highlight the ones that took the most mental effort or were just plain more engaging than the rest.
Shattered Tablet
Deep in an ancient tomb, you’ve discovered a stone tablet with secret information on the locations of other relics. However, while dodging a poison dart, it slipped from your hands and shattered into hundreds of pieces. Can you reassemble it and read the clues?
Jumping into the challenge, we receive a compressed executable file with the flag (assumedly) hidden inside.
As a first step, we run strings and readelf on the file to check for anything that stands out but no luck.
Trying to execute the program, we are asked for input on what the tablet says, so it’s probably comparing our input to the actual flag.

Throwing the executable into Ghidra, we find that the main() function takes the input and compares it to the flag character by character… but out of order.
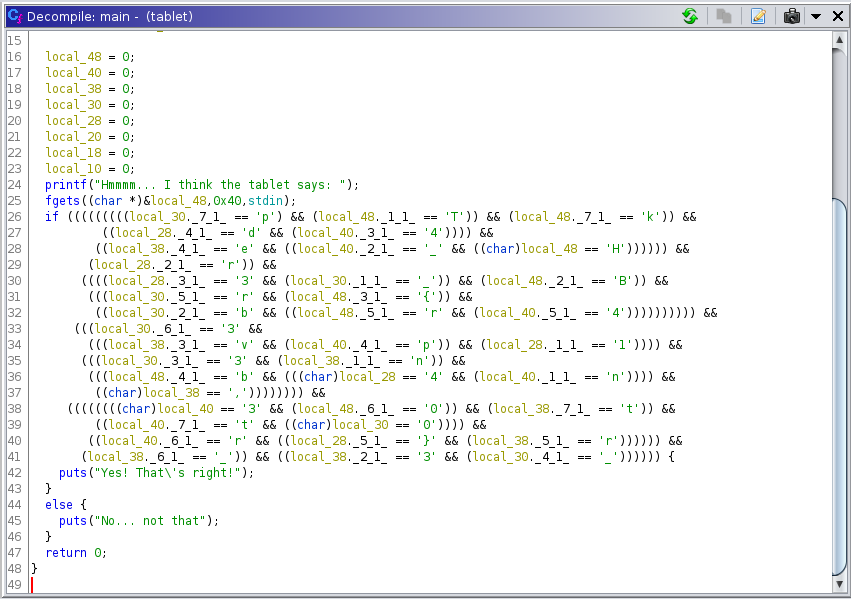
Paying attention to the order of comparisons, we spot the initial characters of the flag (HTB{) as local_48, local_48._1_1_, local_48._2_1_ and local_48._3_1_.
Manually continuing this process until we have what we assume to be the flag, we try the resulting string as input and… it’s correct!

Roten
The iMoS is responsible for collecting and analyzing targeting data across various galaxies. The data is collected through their webserver, which is accessible to authorized personnel only. However, the iMoS suspects that their webserver has been compromised, and they are unable to locate the source of the breach. They suspect that some kind of shell has been uploaded, but they are unable to find it. The iMoS have provided you with some network data to analyse, its up to you to save us.
Our material for this challenge is a .pcap file with just above 19k requests, time to get digging.
First order of business is to sort through the requests for the juicy bits, for this the http.request.method filter will be our friend.
Missing the forest for the trees
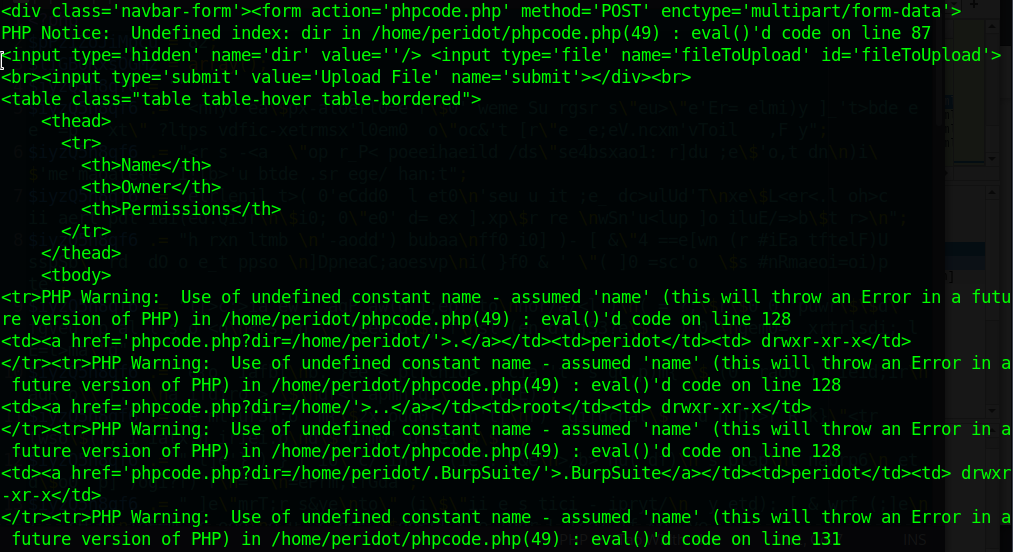
Filtering for the GET requests, we can spot how they start normally, with the adversary going through the normal flow of the website, then at one point begin fuzzing for a specific file.
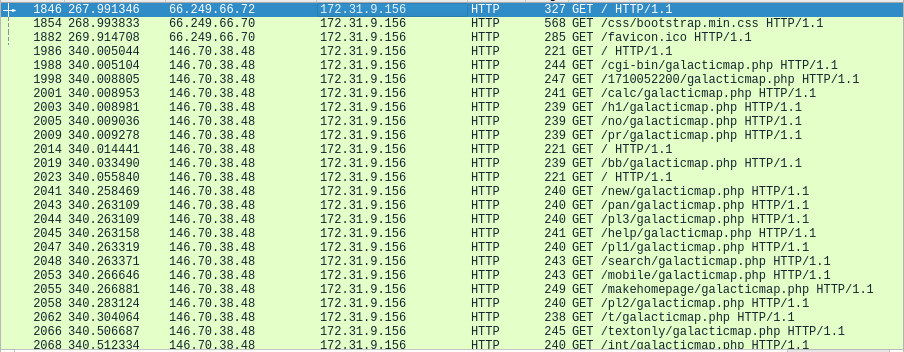
After they find it (which we see because of the request receiving a response code of 200), they start appending some query parameters to the URL, in particular dir and cmd.
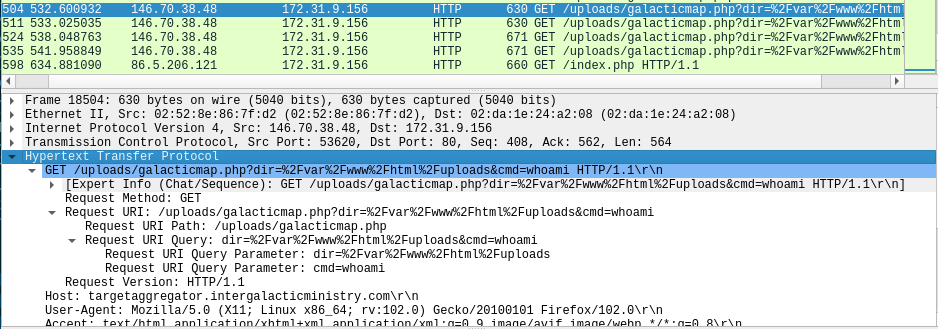
From looking at the requests pointed at the malicious file, we can gather:
- the file is executed as user
www-data - the current folder has
aus-map.pdf,asia-map.pdfand the maliciousgalacticmap.php - the user can
lsthe/folder
But just looking at these requests is not enough to point us to the flag.
Going POSTal
Looking for the POST requests made, we spot a grand total of 9 of them.

Browsing through the contents of the most suspicious one, we see a .php file being submitted.
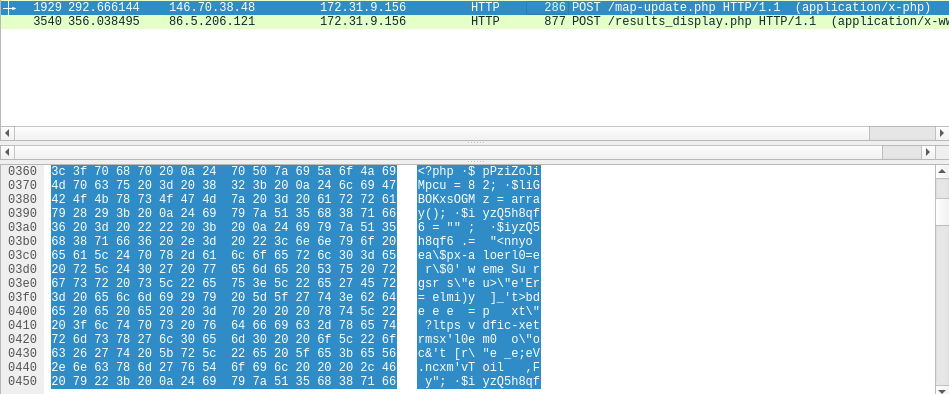
Taking a peep at the code does not reveal much, since it appears to be obfuscated.
Trying to run it in the console with php, we get some actual HTML and a whole lot of PHP Warnings about eval()
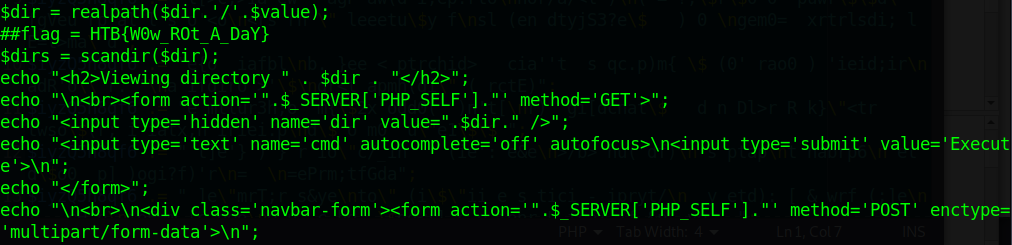
Throwing the file into vim and mass-replacing the eval() for echo() lets us execute the php file with no warnings, revealing the flag hidden as a comment.
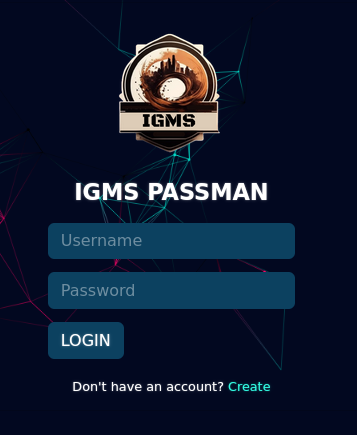
Passman
Pandora discovered the presence of a mole within the ministry. To proceed with caution, she must obtain the master control password for the ministry, which is stored in a password manager. Can you hack into the password manager?
Stepping into the spawned Docker instance, we find a pretty standard login page, with the one oddity present being the option to register.
Intercepting a login request reveals that the website uses a GraphQL to handle the login and that sessions are handled with a JWT token.
Decoding said token from base64 we find that it contains an is_admin: 0 parameter, but messing around with it does not net us much success.
Stepping back and focusing on the GraphQL portion, with the help of hacktricks.xyz
we manage to dump the entire GraphQL schema, and among the mutations offered we find UpdatePassword.
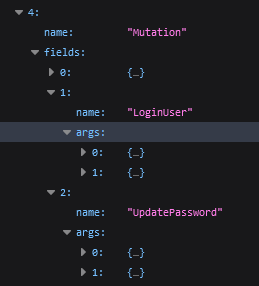
Just calling the mutation as-is confirms that authentication is required, so we register a new account and intercept the first request to a mutation made, replacing the
target mutation with UpdatePassword and aiming it at the admin user.
Then we log out from our test user and try the newly updated admin credentials and… we’re in!
Hijack
The security of the alien spacecrafts did not prove very robust, and you have gained access to an interface allowing you to upload a new configuration to their ship’s Thermal Control System. Can you take advantage of the situation without raising any suspicion?
NCing into the Docker instance gives us the options to Create a config or Load one.
Creating one asks for Temperature Units, Propulsion Components Target Temperature, Solar Array Target Temperature, Infrared Spectrometers Target Temperature and Auto Calibration ON/OFF, then returns a serialized config. The config can be identified as something under Base64 encoding at sight.
Example serialized config:
ISFweXRob24vb2JqZWN0Ol9fbWFpbl9fLkNvbmZpZyB7SVJfc3BlY3Ryb21ldGVyX3RlbXA6ICcxMCcsIGF1dG9fY2FsaWJyYXRpb246ICdPRkYnLAogIHByb3B1bHNpb25fdGVtcDogJzEwJywgc29sYXJfYXJyYXlfdGVtcDogJzEwJywgdW5pdHM6IEN9Cg==Decoded:
!!python/object:__main__.Config {IR_spectrometer_temp: '130', auto_calibration: 'OFF', propulsion_temp: '100', solar_array_temp: '120', units: C}
However, when attempting to load the configuration, we get “Unable to load config!”. Submitting an empty configuration seems to work, though…
A bogus config like amogus = 17 encoded to base64 seems to be accepted as well.
Looking into the technologies used, we find that this is called a “YAML Deserialization Attack” and learn that we can get a “sleep” to execute by sending !!python/object/apply:time.sleep [2].
Looking around for payload crafters, we find peas, which allows us to craft an input that will execute cat flag.txt and nets us the flag.
Restricted
You ’re still trying to collect information for your research on the alien relic. Scientists contained the memories of ancient egyptian mummies into small chips, where they could store and replay them at will. Many of these mummies were part of the battle against the aliens and you suspect their memories may reveal hints to the location of the relic and the underground vessels. You managed to get your hands on one of these chips but after you connected to it, any attempt to access its internal data proved futile. The software containing all these memories seems to be running on a restricted environment which limits your access. Can you find a way to escape the restricted environment ?
Attempting an NC to the Docker instance reveals it to be running OpenSSH, we attempt to directly ssh to it but find that (of course) our user does not exist.
Examining the Dockerfile for the challenge reveals the intended user to be restricted, which we can successfully SSH to without a password.
Upon login we are met with rbash or “restricted bash”, which is fitting given the name of the excercise. After trying some commands it becomes apparent that the user indeed does not have many permissions, being able to run pwd and echo but no ls, cd or any other useful command for navigating. Redirections, such as pipes and output > are not allowed either.
Googling around, I look at a guide on how to break out of a restricted shell and after trying a few of the methods, initiating the connection with -t "bash --noprofile" is successful in giving us an unrestricted shell. After that we look around for a bit and find the flag in the root directory.